React JS 로 SPA 시작하기
SPA(Single page application) vs SSR(Server Side Rendering) vs SSG(Static Site Generator)
SPA는 웹 페이지 리소스를 모두 받은 후 요청에 대한 데이터만 받아서 클라이언트 상에서 rendering
SSR은 요청에 대한 웹 페이지를 서버에서 만들어서 클라이언트로 보내는 방식
SSG는 웹 페이지를 모두 미리 만들어 놓고 요청 한 페이지를 보내는 방식
UI/UX 가 유연하고 네이티브 어플리케이션 같은 효과를 줄 수 있는 SPA 방식으로 개발
angular js, vue js, react js 등이 있지만 React JS를 선택하기로 했다.
개인적으로 FrontEnd 개발은 전문으로 하지 않아서 미흡한 부분이 많을 듯 하다…. 계속 공부하면서 발전하고자 한다.
- Node JS 설치
front end 개발에도 필요한 라이브러리들이 있고, 테스트를 실행해볼 수 있어야 한다.
그런 기능들을 지원해주는 npm 을 사용하기 위해서 nodejs를 설치한다.- nodejs 다운로드 Nodejs 다운로드
LTS 혹은 Current 버전을 다운로드 (LTS 가 안정화 버전) - 다운로드 받은 파일 더블클릭
- 넥스트 열심히 누르면 설치 완료
-
설치확인
 node -v
 npm -v
버전 정보가 나오면 설치 완료
- nodejs 다운로드 Nodejs 다운로드
- react 프로젝트 생성
- 프로젝트를 위한 디렉토리를 생성 후 프로젝트 생성
 npx create-react-app <app name>
 ex) npx create-react-app hitec-front
npm start : 개발 장비에서 개발 된 페이지를 볼수 있는 서버 동작
npm run build : 운용장비에 적용하기 위한 정적 리소스 생성 - 프로젝트 확인
프로젝트 디렉토리에서 터미널을 열고 아래 명령어 입력 후 브라우저 확인npm start
- 프로젝트를 위한 디렉토리를 생성 후 프로젝트 생성
- 화면 콤포넌트 생성
-
컴포넌트 생성
게시판에 대한 컴포넌트를 생성하려고 한다. 어떤 화면이 필요할까??
게시글 리스트 화면 - boardList
게시글 상세 화면 - boardPage
게시글 작성화면 - addBoardForm
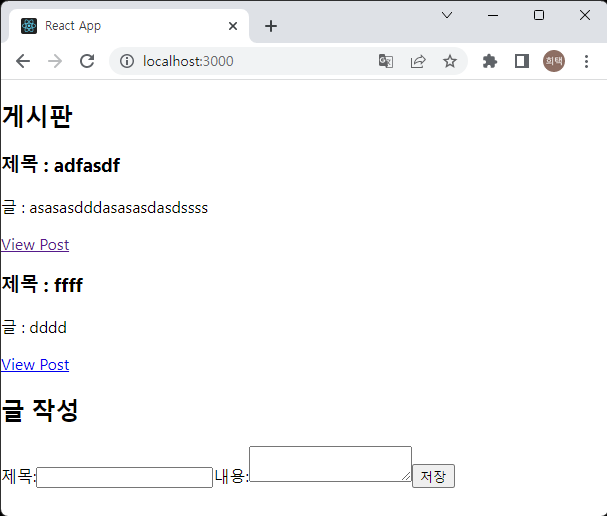
게시글 수정화면 - editBoardForm//BoardList.js import React, { useEffect } from 'react' import { useSelector, useDispatch } from 'react-redux' import { Link } from 'react-router-dom' import { fetchBoardList } from './boardSlice' export const BoardList = () => { const boardList = useSelector((state) => state.board.boardList); const listStat = useSelector((state) => state.board.listStat); const dispatch = useDispatch(); useEffect(() => { if(listStat === 'idle'){ dispatch(fetchBoardList()); } }, [listStat]) const renderedBoard= boardList.map((board) => { return ( <article className="excerpt" key={board.id}> <h3>제목 : {board.title}</h3> <p className="content">글 : {board.content.substring(0, 100)}</p> <Link to={`/board/${board.id}`} className="button muted-button"> View Post </Link> </article> ) }) return ( <section className="board-list"> <h2>게시판</h2> {renderedBoard} </section> ) }게시글의 리스트를 볼 수 있는 화면
useSelector, useDispatch 는 리덕스 함수로 전역으로 설정되어 있는 상태를 가져오거나 전역으로 설정 된 함수를 실행 할 때 사용
useEffect는 리액트 함수로 콤포넌트의 변화 및 props 의 변화에 따라 특정 로직을 수행 할 수 있다.//BoardPage.js import React, { useEffect } from 'react' import { useSelector, useDispatch} from 'react-redux' import { Link, useParams } from 'react-router-dom' import { fetchBoard } from './boardSlice' export const BoardPage = () => { const { id } = useParams(); const dispatch = useDispatch(); const board = useSelector((state) => state.board.currentBoard); useEffect(() => { dispatch(fetchBoard(id)); }, [id]) if (!board) { return ( <section> <h2>Post not found!</h2> </section> ) } return ( <section> <article className="board"> <h2>제목 : {board.title}</h2> <p className="content">글 : {board.content}</p> <Link to={`/editboard/${board.id}`} className="button"> 수정 </Link> </article> </section> ) }게시글의 상세페이지
userParams, Link 는 react route dom 의 함수로 페이지가 넘어오 올 때 파라미터를 가져오는 함수와 다른 페이지로 변경하기 위한 함수이다.//AddBoardForm.js import React, { useState } from 'react' import { useDispatch } from 'react-redux' import { addBoard } from './boardSlice' export const AddBoardForm = () => { const [title, setTitle] = useState('') const [content, setContent] = useState('') const dispatch = useDispatch() const onTitleChanged = (e) => setTitle(e.target.value) const onContentChanged = (e) => setContent(e.target.value) const onSaveClicked = () => { if (title && content) { dispatch( addBoard({ title, content, })) setTitle('') setContent('') } } return ( <section> <h2>글 작성</h2> <form> <label htmlFor="title">제목:</label> <input type="text" id="title" name="title" value={title} onChange={onTitleChanged} /> <label htmlFor="content">내용:</label> <textarea id="content" name="content" value={content} onChange={onContentChanged} /> <button type="button" onClick={onSaveClicked}> 저장 </button> </form> </section> ) }새로 글을 작성하는 화면
useState 는 콤포넌트 내부에 변수를 설정하고 변수에 값을 세팅하기 위한 함수이다.
리액트는 변수의 값을 변경하지 않고, 새로운 값으로 세팅해야한다. -
디렉토리 설정
새로운 기능이 생길 때 features 아래에 디렉토리로 생성/src index.js: the starting point for the app App.js: the top-level React component /app store.js: creates the Redux store instance /features /board AddBoardForm.js: 게시글 작성 콤포넌트 EditBoardForm.js: 게시글 수정 콤포넌트 BoardList.js: 게시글 리스트 콤포넌트 BoardPage.js: 게시글 상세화면 콤포넌트 boardSlice.js: the Redux logicstore.js, boardSlice.js 는 redux 사용을 위한 파일임
-
- React Router 적용
- react router dom 설치 react 에서 페이지 전환을 도와주는 React Router 설치 및 적용
npm install react-router-dom -
Browser Router 적용 App.js 파일을 수정
 import React from 'react';

 import { BrowserRouter, Routes, Route } from 'react-router-dom'

 import { AddBoardForm } from './features/board/AddBoardForm.js'
 import { EditBoardForm } from './features/board/editBoardForm'
 import { BoardList } from './features/board/boardList'
 import { BoardPage } from './features/board/boardPage'

 function App() {
 return (
     <BrowserRouter>
     <div className="App">
         <Routes>
         <Route exact path="/" element={<BoardList />} />
         <Route exact path="/board/:id" element={<BoardPage/>} />
         <Route exact path="/editboard/:id" element={<EditBoardForm/>} />
         <Route exact path="/board" element={<AddBoardForm/>} />
         </Routes>
     </div>
     </BrowserRouter>
 );
 }

 export default App;
BrowserRouter 를 통해 화면이 전환이 된다. Routes 항목 중 Route path 와 동일한 URL 을 가지면 설정된 element 의 화면이 보여지게 된다.
Link 등의 사용하여 화면 전환을 할 수 있다.
- react router dom 설치 react 에서 페이지 전환을 도와주는 React Router 설치 및 적용
- 리덕스 설정
리액트로 개발할 때 상태관리를 해주면서 프로젝트를 좀 더 효율적으로 구성할 수 있게 도와주는 라이브러리이다.- 리덕스 설치
react 개발 디렉토리에서npm i react-redux npm i redux npm i @reduxjs/toolkit -
스토어 생성 (store.js)
전역 상태를 관리하기 위한 store 를 생성
feature를 생성하면 store 에 추가한다.import { configureStore } from '@reduxjs/toolkit' import boardSlice from '../features/board/boardSlice' export default configureStore({ reducer: { board: boardSlice } }) - index.js 파일에 App 전체를 Provider store 로 감싸기
import React from 'react'; import ReactDOM from 'react-dom/client'; import './index.css'; import App from './App'; import store from './app/store' import { Provider } from 'react-redux' const root = ReactDOM.createRoot(document.getElementById('root')); root.render( <React.StrictMode> <Provider store={ store }> <App /> </Provider> </React.StrictMode> ); -
리덕스의 리듀셔와 액션 생성 (Slice)
리덕스는 상태가 변할 때 action 을 발생시키며
action 에 따라 상태의 변화를 발생시키는 reducer로 구성되어 있다.
리덕스 툴킷을 사용하면 액션과 리듀서를 만드는게 쉬워진다.import { createSlice, createAsyncThunk } from '@reduxjs/toolkit' import axios from 'axios' const initialState = { boardList: [], listStat: 'idle', currentBoard: null, error: null } export const fetchBoardList = createAsyncThunk('board/boardList', async () => { const response = await axios.get('http://192.168.56.1:8899/boards'); return response.data; }) export const fetchBoard = createAsyncThunk('board/board', async (id) => { const response = await axios.get('http://192.168.56.1:8899/board/'.concat(id)); return response.data; }) export const addBoard = createAsyncThunk('board/addBoard', async (boardObj) => { const response = await axios.post('http://192.168.56.1:8899/board', boardObj); return response.data; }) export const editBoard = createAsyncThunk('board/editBoard', async (boardObj) => { const response = await axios.put('http://192.168.56.1:8899/board', boardObj); return response.data; }) const boardSlice = createSlice({ name: 'board', initialState, reducers: {}, extraReducers(builder) { builder .addCase(fetchBoardList.fulfilled, (state, action) => { state.boardList = action.payload; state.listStat = 'successed'; }) .addCase(fetchBoard.fulfilled, (state, action) => { state.currentBoard = action.payload; }) .addCase(addBoard.fulfilled, (state, action) => { state.currentBoard = action.payload; state.listStat = 'idle'; }) .addCase(editBoard.fulfilled, (state, action) => { state.currentBoard = action.payload; state.listStat = 'idle'; }) } }) export const { postUpdated } = boardSlice.actions; export default boardSlice.reducercreateSlice 를 통해 actions 와 reducers 를 생성
외부 통신은 axios 를 사용하며 리덕스에서 외부 연동을 위해 thunk를 사용 (npm install axios)
- 리덕스 설치
- 서버는 앞서 만든 스피링으로 서버 만들기에서 만든 서버를 사용

디자인은 엉망이지만 작동은 잘 한다.
기능도 정말 단순하다. 하지만 단순한 것에서부터 출발하는거다…